 Skip to content


Protecting your raised garden beds from pests is crucial for ensuring healthy plant growth and maximizing yield. This guide provides a concise and practical approach to safeguarding your garden from a variety of pests, such as slugs, moles, rodents, birds, etc.
1. Placement and Preparation
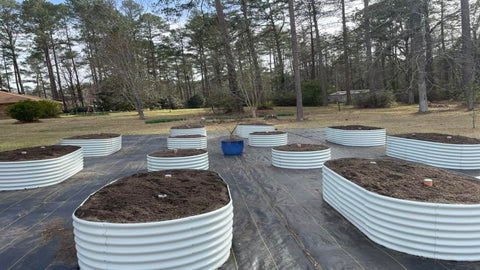
Choosing the optimal location for your raised garden bed is a critical first step, directly influencing your garden's vulnerability to local pest populations. Begin by understanding the specific pest challenges in your region, whether they're burrowing rodents, invasive insects, or larger mammals. This knowledge allows for targeted placement, potentially away from known pest hotspots. Start the physical preparation by thoroughly leveling the ground, creating a flat, stable base that ensures uniform water distribution and root growth. During this process, rigorously remove all weeds, focusing particularly on invasive species like bermudagrass. This aggressive weed can quickly overrun garden spaces, and its removal is essential to prevent future pest issues, as these weeds can attract and harbor pests.
2. Triple Threat Bottom Prep
To create a formidable barrier against weeds and pests from below, a three-layer defense system is effective:
- Landscape Fabric:Lay this fabric tightly across the base of your garden bed area to block weeds from sprouting through the soil. It's crucial to extend the fabric well beyond the edges of the bed and overlap sections to ensure complete coverage. This fabric acts as a physical barrier, preventing weeds from growing into the bed while still allowing water and air to penetrate, which is vital for healthy soil.
- Hardware Cloth:Position a layer of durable half-inch hardware cloth directly on top of the landscape fabric. This metal mesh serves as a robust shield against burrowing animals, such as gophers and moles, who are deterred by the tough, closely woven metal barrier. Ensure that this layer is secured tightly to the edges of the bed frame to prevent any gaps that pests might exploit.
- Cardboard Layer:Finally, add a covering of cardboard or ram board over the hardware cloth. This addition not only suppresses any weeds that might have survived the landscape fabric barrier but also decomposes over time, enriching the soil while continuing to block pest access. Ensure the cardboard completely covers the underlying layers and overlaps to prevent pest intrusion through joints.
3. Bed Installation
Carefully position the raised bed frame over the prepared and protected base. For wooden beds, it is advisable to attach the fabric and mesh directly to the underside of the bed using a staple gun, ensuring a secure and permanent attachment that pests cannot bypass. For beds constructed from metal, take special care to tuck the edges of your protective materials beneath the bed, filling any spaces with soil or mulch to seal potential entry points. This step is critical as even small openings can provide access for pests such as snails and insects to enter the bed.
4. Top Frame Construction
Building a supportive frame around your raised bed enhances its defenses against airborne and climbing pests. Start by assembling a framework using electrical conduit and a maker pipe kit, which provides versatile fittings and the necessary rigidity. This frame can be customized in height according to the specific needs of your plants and the pests you're targeting. Secure the frame by tightening bolts and nuts at each connection point, ensuring it can withstand environmental stresses such as wind.
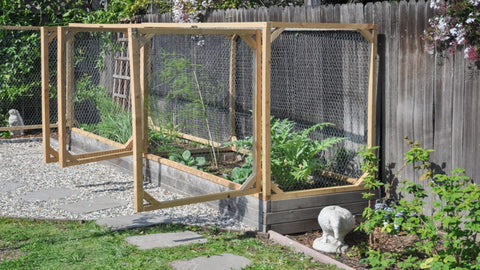
Install corner pieces to anchor the structure solidly at each angle, adding structural integrity. Introduce crossbeams across the top and sides of the frame to distribute weight evenly and provide ample support for any coverings you'll add later. This setup not only strengthens the overall construction but also serves as a versatile base to attach various types of netting or fabric, essential for protecting your plants from pests.
5. Cover Options
Selecting the right type of cover for your raised garden bed depends on the specific pests and climate conditions in your area:
- Bird Netting:Opt for bird netting to protect your crops from birds, which can be particularly problematic when fruits or seeds are present. To be effective, the netting should be suspended high enough above the plants so birds cannot reach through it to access the plants. Ensure it is securely attached to the top frame and has no gaps at the edges where birds could potentially enter.
- Shade Cloth: Ideal for gardens in hot climates or areas where flying insects are a common threat, shade cloth can significantly reduce the temperature around your plants, mitigating heat stress and preventing pest infestations. When installing shade cloth, attach it firmly to the frame to cover the entire bed, providing a barrier that also shields plants from excessive sunlight.
- Frost Cover:In cooler climates or during unexpected cold snaps, a frost cover is invaluable. It not only guards against frost damage by insulating your plants but also prevents flying insects from making contact with the foliage. The frost cover should drape over the frame and be sealed around the edges to maintain a warm environment underneath and extend the growing season by protecting sensitive plants from early or late frosts.
6. Use Natural Repellents
- Garlic and Chili Spray:This spray is an effective, eco-friendly option for deterring a range of pests. To make it, crush several cloves of garlic and a few hot chili peppers, then mix into a liter of water, adding a teaspoon of dish soap to help the mixture adhere to plant surfaces. This concoction irritates the sensory organs of many pests, making it a deterrent for insects and small mammals alike. Spray it around the perimeter of your plants, being careful to avoid direct contact with the foliage to prevent burn.
- Marigolds:Known for their vibrant color and pungent scent, marigolds are excellent at repelling garden pests, including nematodes and various insects. Planting marigolds around the edges of your raised bed creates a natural barrier that exploits the repellent properties of these flowers. Their strong odor masks the scent of your crops, confusing pests and effectively reducing infestation.
7. Traps and Bait
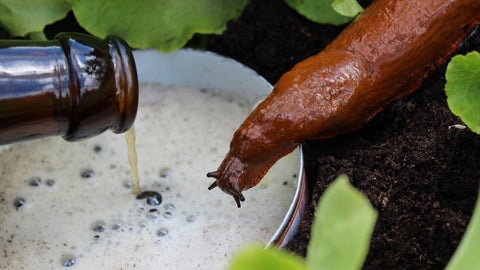
- Beer Traps for Slugs:Slugs are attracted to the yeast in beer. To use this method, fill several shallow containers-such as pie tins-with beer and place them around your garden, especially near susceptible plants. The slugs are drawn to the smell, fall into the beer, and drown. Check and refill the traps regularly to maintain their effectiveness.
- Sticky Traps:These are simple yet effective tools for controlling flying insects. Place sticky traps near the plants most affected by pests to capture flying insects. These traps not only reduce the number of potential pests but also help monitor the types of insects frequenting your garden, allowing for targeted control strategies. Choose the color of the traps based on the type of insects you are targeting; yellow traps typically attract aphids and whiteflies, while blue traps attract thrips.
8. Additional Recommendations
For gardens consistently troubled by rodents, additional measures may be necessary. Reinforce the perimeter of your garden bed with a fine-mesh hardware cloth. Secure this mesh with sturdy clips or zip ties, ensuring it extends several inches into the ground to prevent rodents from burrowing underneath. This barrier is crucial for protecting your garden from subterranean attacks and preserving the integrity of your raised bed.
Final Words
By combining these effective strategies, you can significantly reduce the impact of pests on your raised garden beds. From preparation to ongoing maintenance, each step is designed to provide optimal protection and ensure the health and productivity of your garden. Keep these tips in mind to enjoy a robust garden season after season.
Read More
- Anleolife Garden View: Do Metal Raised Garden Beds Get Too Hot To Hold
- Anleolife Garden View: What Is The Right Size of Your Metal Raised Gar
- Can You Imagine Trees in Metal Raised Garden Beds? – Anleolife Garden
- A Concise Filling Approach as Reference – Anleolife Garden
- Maximize Raised Bed Soil Life | Garden Longevity Secrets – Anleolife Garden